Table of Contents
How To Create Spooktacular Halloween Nail Art
Halloween is the perfect time to get creative with your nail art. Whether you’re going to a spooky costume party or just want to embrace the spirit of the holiday, Halloween-themed nail art can be a fun and expressive way to do it. In this article, we’ll delve into the world of Halloween nail art and explore tips and techniques to help you create your own hauntingly beautiful designs.
1. Start with the Basics:
Before you dive into the intricate details of Halloween nail art, it’s essential to ensure your nails are in good shape. Trim, shape, and buff your nails, and don’t forget to apply a clear base coat to protect them. This step provides a clean canvas for your spooky designs.
2. The Color Palette:
Halloween is all about dark, mysterious colors. Think deep blacks, blood-reds, eerie purples, and toxic greens. These colors set the perfect backdrop for your spooky nail art creations.
3. Nail Art Brushes and Tools:
Invest in a good set of nail art brushes and tools. These will be your trusty companions when it comes to adding intricate details to your Halloween nail designs. Thin brushes, dotting tools, and nail tape are essential for precision.
4. Halloween Nail Design Ideas:
Here are some Halloween nail art ideas to spark your creativity:
- Spooky Silhouettes: Create haunting silhouettes of bats, cats, witches, and haunted houses against a dark, moody background.
- Creepy Crawlers: Paint tiny spiders, cobwebs, or even an army of ants on your nails for that eerie effect.
- Ghoulish Gradients: Experiment with gradient techniques to create a fading effect from one Halloween color to another, adding depth to your design.
- Jack-O’-Lantern Nails: Carve virtual jack-o’-lanterns on your nails with orange polish and black detailing.
- Zombie Apocalypse: Turn your nails into mini canvases for zombie art. Torn flesh, exposed bones, and oozing wounds can make for a gruesome yet captivating design.
5. Freehand or Stamping?
You have two main options for creating your Halloween nail art: freehand or stamping. Freehand allows for more creativity and unique designs but may require more practice. Stamping, on the other hand, is more accessible for beginners and provides precise and intricate patterns.
6. Seal the Deal:
Once your Halloween nail art is complete, don’t forget to seal it with a clear topcoat. This not only protects your design but also gives it a glossy finish.
7. Maintenance:
Remember that Halloween nail art doesn’t have to last forever. If you’re wearing it for a special occasion, you can remove it afterward. Use a non-acetone nail polish remover to take off the design gently.
Ghostly Nail Gel
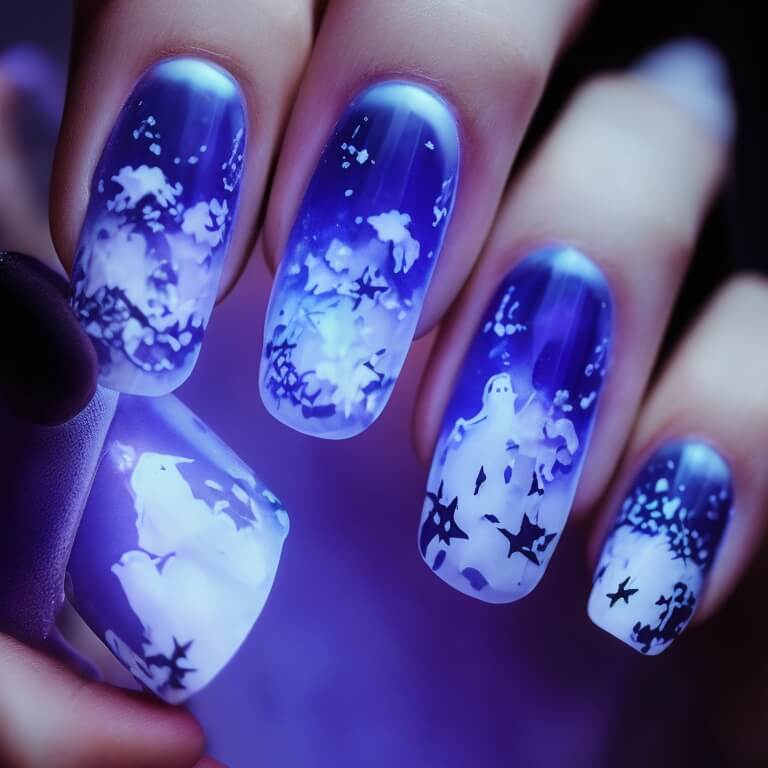
How To Create Spooktacular Halloween Nail Art. Creating “Ghostly Gel Nails” is a fantastic idea for a Halloween-themed nail art design. Here’s how you can create spooky and ghostly gel nails:
Materials You’ll Need:
- Clear or light gray gel nail polish (base color)
- White gel nail polish (for ghost designs)
- Gel topcoat
- UV or LED nail lamp
- Nail art brush or dotting tool
- Nail cleanser or alcohol for cleaning
Step-by-Step Instructions:
1. Prep Your Nails:
- Start by shaping and cleaning your nails. Push back your cuticles and remove any old nail polish.
2. Apply a Base Color:
- Apply a clear or light gray gel nail polish as your base color. Cure it under the UV or LED nail lamp according to the manufacturer’s instructions. You may need to apply two thin coats for full coverage.
3. Create Ghost Designs:
- Using white gel nail polish and a nail art brush or dotting tool, carefully draw ghost shapes on your nails. Ghosts can be simple oval shapes with wavy edges.
- Add two small dots for eyes on each ghost. You can make the eyes look spooky or friendly, depending on your preference.
- Cure the white gel polish under the nail lamp.
4. Add Details:
- To create a ghostly effect, use a thin nail art brush or toothpick to add wispy lines or swirls around the ghosts to make them look ethereal and ghostly.
- Cure the designs again under the nail lamp.
5. Seal with Topcoat:
- Apply a gel topcoat over the entire design to protect it and give it a glossy finish. Make sure to cap the free edge of your nails (run the brush along the tip) for added durability.
- Cure the topcoat under the nail lamp for the recommended time.
6. Clean and Finish:
- After curing, use a nail cleanser or alcohol to remove any sticky residue left on your nails from the gel topcoat.
- Finish by applying a cuticle oil or nail conditioner to keep your nails healthy and hydrated.
Tips:
- Take your time when creating the ghost designs to make them as detailed or whimsical as you like.
- Gel polish requires curing under a UV or LED lamp, so follow the manufacturer’s instructions carefully.
- Practice on a nail art palette or a piece of foil before applying the designs to your nails.
- Experiment with different ghostly expressions and poses for a playful or eerie look.
- You can add glitter or glow-in-the-dark gel polish for extra Halloween flair.
With these steps and some creativity, you can achieve ghostly gel nails that are perfect for Halloween or any spooky-themed occasion. Enjoy your hauntingly beautiful nail art!
Halloween Pumpkin Nails
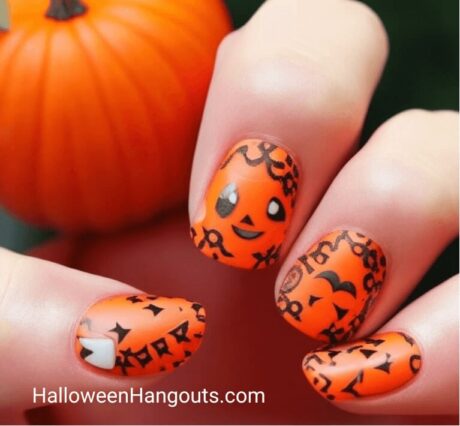
How To Create Spooktacular Halloween Nail Art. Creating pumpkin nail art is a fun and festive way to celebrate the fall season, especially Halloween and Thanksgiving. To master the art of pumpkin nail design, you can try various techniques and styles. Here are some steps and tips to help you achieve a pumpkin-themed manicure:
Materials You’ll Need:
- Orange nail polish
- Green nail polish (for stems)
- Black nail polish or nail art pen (for details)
- Base coat and topcoat
- Thin nail art brush or dotting tool
- Toothpick or orange stick (for smaller details)
Step-by-Step Instructions:
1. Prep Your Nails:
- Start by shaping and filing your nails to your desired length and shape.
- Apply a clear base coat to protect your nails and make the nail art last longer.
2. Apply Orange Nail Polish:
- Apply 2-3 coats of orange nail polish to all your nails. Allow each coat to dry completely before applying the next one.
3. Create Pumpkin Shapes:
- Using a thin nail art brush or toothpick, draw a circular shape on your nail to represent the pumpkin. You can make them different sizes and shapes on each nail for variety.
- Fill in the circle with orange nail polish. Try to make the pumpkin shape as smooth as possible. You may need to apply two coats for full opacity.
4. Add Pumpkin Stems:
- Use green nail polish or mix yellow and blue to create a green shade if you don’t have green polish. Create a small, curved line at the top of each pumpkin to represent the stem.
5. Create Pumpkin Faces:
- You can choose to add pumpkin faces to your nails with black nail polish or a nail art pen. Use a thin brush or a toothpick to carefully draw eyes, noses, and mouths on each pumpkin. You can make them spooky, cute, or even goofy—be creative!
6. Apply Top Coat:
- Once your pumpkin nail art is dry, apply a clear top coat to seal in your design and add shine. This will also help protect your nail art and make it last longer.
7. Clean Up:
- Use a nail polish remover and a small brush or Q-tip to clean up any mistakes or polish that may have gotten on your skin.
8. Practice and Experiment:
- Pumpkin nail art might take some practice, especially if you’re new to nail art. Don’t be discouraged if your first attempt isn’t perfect. Keep practicing and experimenting with different designs and colors.
Tips:
- Use nail art tools like dotting tools and nail art brushes for precise detailing.
- Allow each layer of polish to dry completely before moving on to the next step.
- You can add extra details like glitter, rhinestones, or matte topcoat for added texture and dimension.
- You can also experiment with different pumpkin colors, like white or teal, to create unique designs.
- Consider watching nail art tutorials online for inspiration and guidance.
How To Create Spooktacular Halloween Nail Art. With practice and patience, you can master the art of pumpkin nail design and create beautiful and festive nail art for the fall season. The Halloween Nail Art is just one of many activities that make Halloween so creative.
In conclusion, Halloween nail art is a fantastic way to embrace the spooky season and showcase your creativity. With the right tools, a bit of practice, and a dash of imagination, you can create nail art that will leave everyone spellbound. So, pick your favorite Halloween theme, gather your supplies, and let your nails tell a hauntingly beautiful story this Halloween. Happy nail art-ing!